IN-14(前苏联ИН-14)辉光钟v2版|Nixie Clock【严泽远作品】
我的上一代IN-14辉光钟诞生于3个多月前,延续了QS18-12辉光钟经典的功能和特点,仅仅是和QS18-12黄金纪念版使用了不同的辉光管。
很多朋友在收藏以后,纷纷提出了一些个人想法,经过仔细的斟酌,汇总了一些需求,结合本人的改进思路,IN-14辉光钟v2版由此诞生…
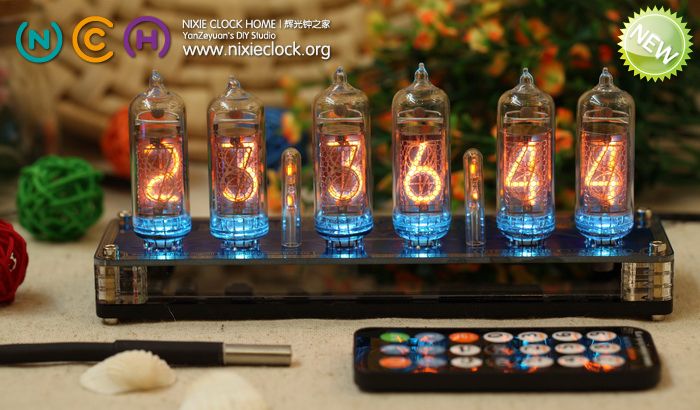
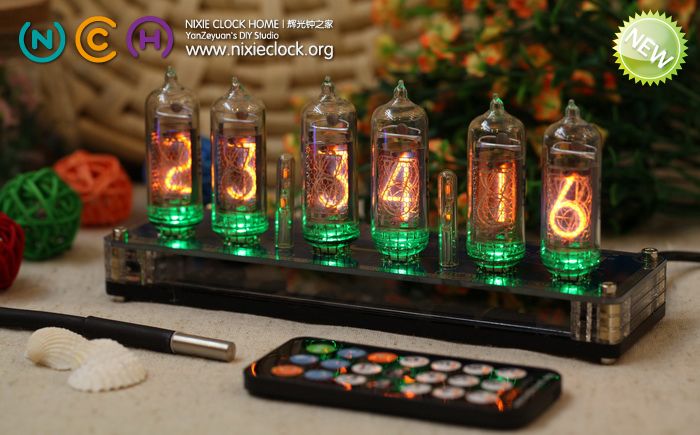
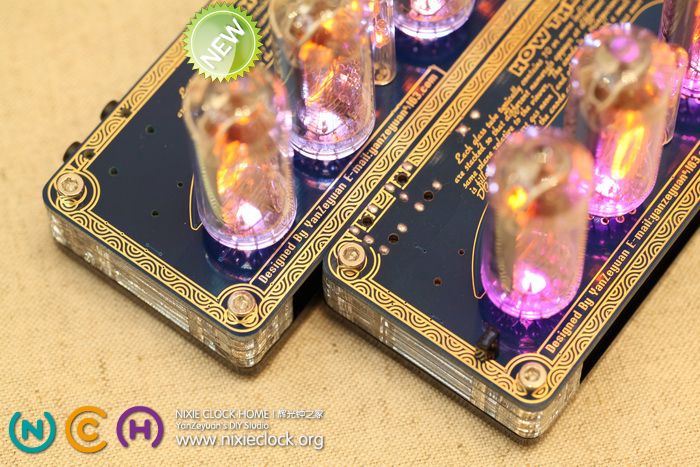
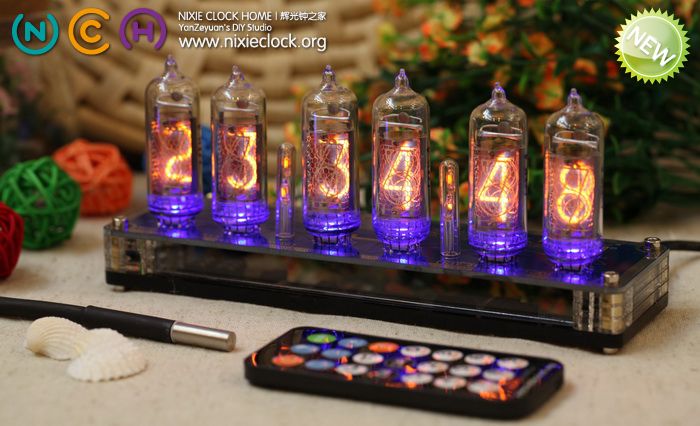
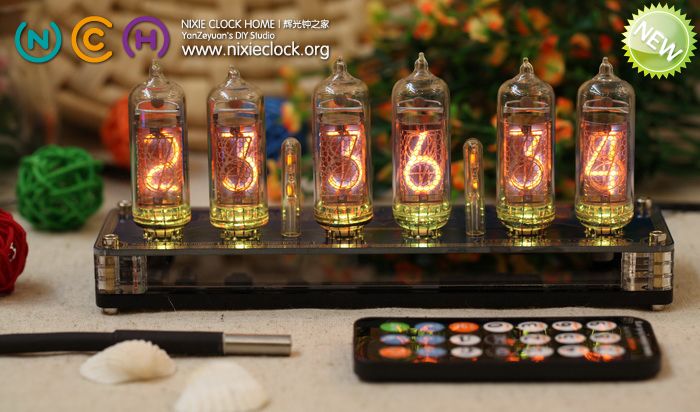
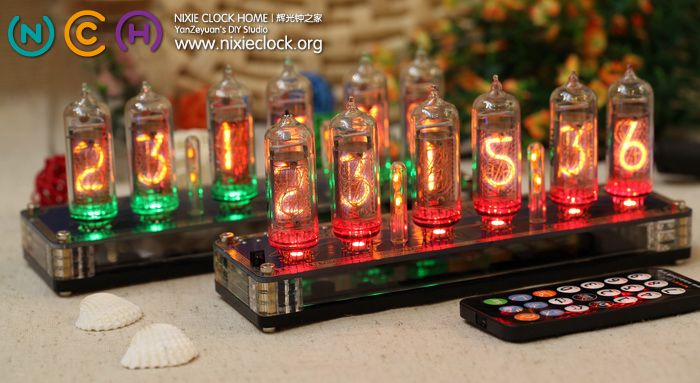
先来SHOW一下IN-14辉光钟v2版:
这次的升级分为两个部分:
一、硬件电路的升级与调整;
二、软件功能的增加;
首先,先介绍一下硬件电路升级和调整的部分:
1、将原有的五个直插器件(电源插座、温度传感器插座、GPS插座、蜂鸣器、红外线接收头)全部改为贴片封装。
上一版本的IN-14辉光钟PCB板上,这五个器件都是采用的直插封装,所以在焊接的时候,顶面会留下许多焊点,影响了整体的美观;所以此次升级后,将这五个元器件全部更换为贴片封装,这样在辉光钟PCB顶部将不再有任何焊盘出现,左边立起来的红外线接收头也被安放在底部,是整体更加完美;
看一下升级之前和升级之后的PCB正面对比图片:
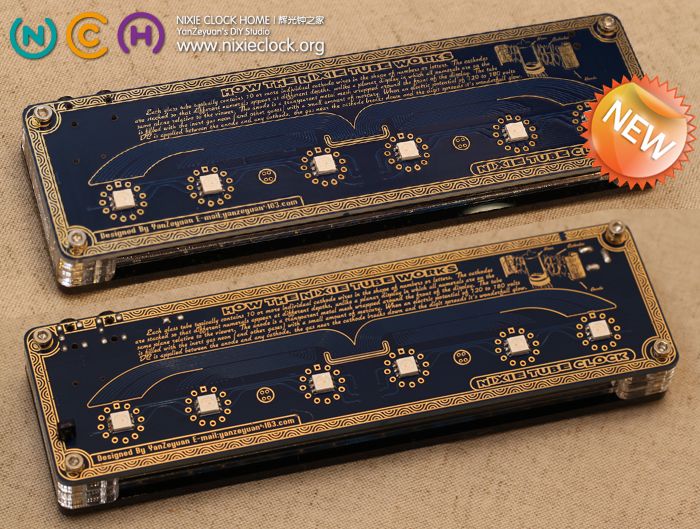
再来一组近照,近距离对比一下细节:
通过上面几张图片的对比,能清楚的看到辉光钟的左后方和右后方已经没有了焊盘;
并且PCB边缘的花纹线条也不再被焊盘所阻断;
辉光钟左前方的红外线接收头也不再突兀,但丝毫不影响红外线遥控功能;
再来看一张底部的对比图片,通过图片可以看出,除了更改的5个直插器件现在变为贴片了以外,12V输入端的滤波电容也改为了贴片封装,高压电路部分的MOS管也改为了贴片封装:

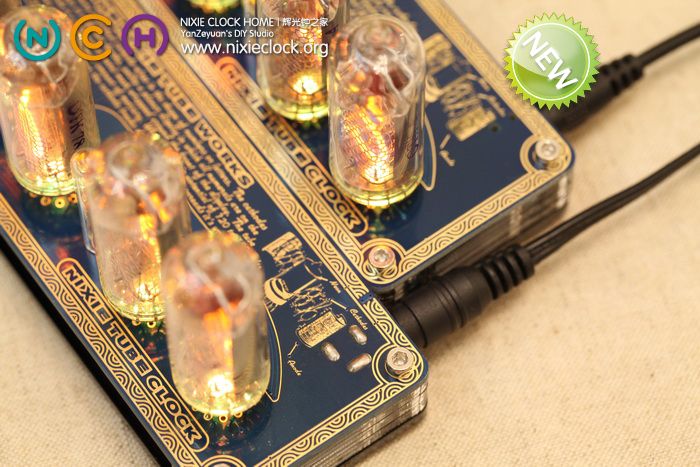
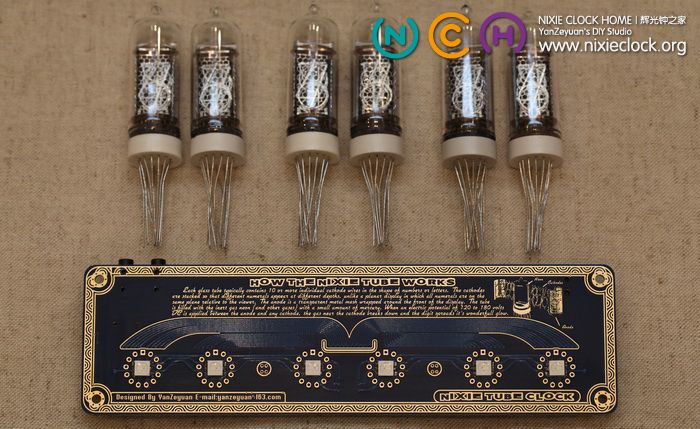
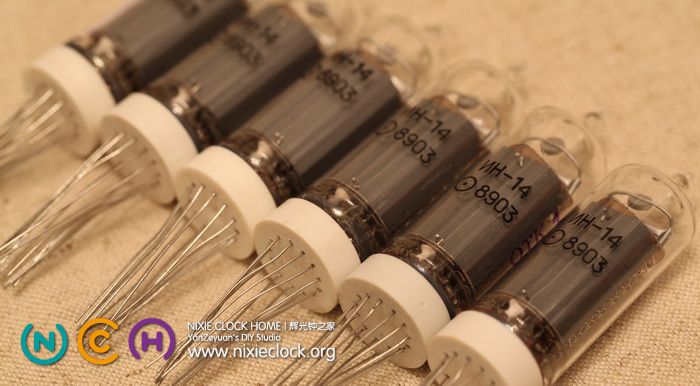
2、更改了辉光管的焊盘封装。
上一版本的IN-14辉光钟使用的是QS18-12辉光钟的PCB板,而IN-14辉光管共有13个管脚(QS18-12有12个管脚),所以在安装IN-14的时候要将IN-14辉光管的部分管脚错位安装,造成了IN-14辉光管无法完美的贴合PCB板,而且需要剪断两根不用的管脚。
升级之后的v2版,辉光管的焊盘专为IN-14辉光管所设计,有13个焊盘,直接将IN-14辉光管的所有管脚一对一插入即可,贴合完美。
先看一下现在安装IN-14辉光管管脚与焊盘对应的图片:
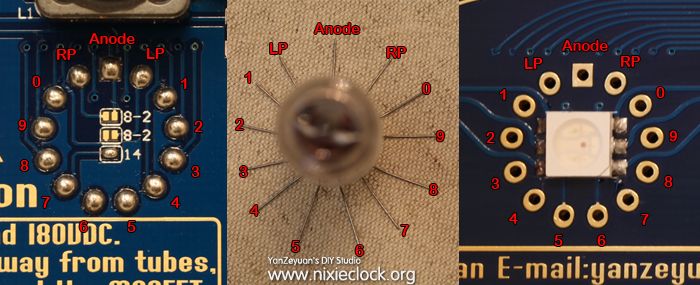
再看一下以前的版本安装辉光管和新版本安装辉光管后的对比图片:
在软件方面,v2版本也进行了功能升级,主要改进和增加了以下部分:
1、增加了定时开、关机功能。
由于辉光管的寿命有限,为了延长辉光管的使用寿命,有朋友向我建议,可以增加定时开机和关机的功能,比如白天无人在家时,可自动关闭显示,延长辉光管寿命。或者设置为夜里某一时间段自动关机等等。
所以v2版本增加了两个设置项,可以分别设置关机时间和开机时间。
当到达关机时间后,辉光钟会自动关闭显示,并且自动关闭LED背景灯,用于保护辉光管,延长辉光管使用寿命。但是不影响设置操作,任何设置操作时,比如按下SET键,或者按下查看温度、查看日期、查看和设定闹钟等等,辉光钟会立即显示正常内容,设置或者查看完毕以后自动回到关闭状态。
如果在自动关机时间段内想要查看当前时间,只需要按下遥控器的POWER键,辉光钟会自动开机5秒钟,然后返回关机状态。
如果在开机上电时恰好处于关机时间段,辉光钟会在通电后正常显示5秒钟,然后才进入自动关机状态,避免让用户误认为辉光钟未通电。
2、增加了蜂鸣器模式设置功能。
由于IN-14辉光钟内置了一颗蜂鸣器,用于产生操作提示音以及闹钟铃声等等,但是有些朋友建议,最好能够关闭这些声音,因为在某些场合下调节时钟时不希望听到任何声音。
所以v2版本增加了一个设置项,可设置启用蜂鸣器或关闭蜂鸣器。
关闭蜂鸣器后,所有的按键操作将不会再有提示音,但无论是否关闭蜂鸣器,闹钟的铃声时钟是会响的。
3、更新了设置状态下数字切换的模式。
在之前的版本下,进入某一设置模式时,被设置的数字会以当前的数字切换特效进行闪烁显示。比如在正常状态下将时钟设置为了Flipover切换特效模式,但在设置模式时,由于数字闪烁的很快,造成Flipover特效无法使用户看清楚当前设置的内容,所以v2版本更正了该问题:
无论正常显示状态下将切换特效设置为何种模式,进入设置状态,均以Crossfading特效模式进行闪烁提示。
=-=-=-=-=-=-=-=- =-=-=-=-=-=-=-=- =-=-=-=-=-=-=-=- =-=-=-=-=-=-=-=- =-=-=-=-=-=-=-=-=
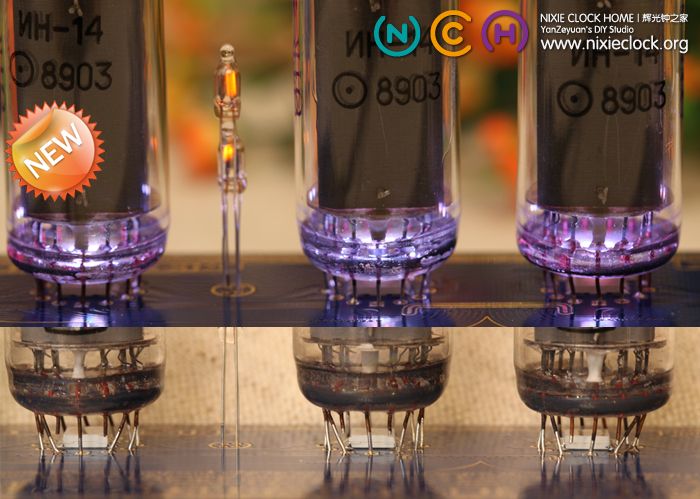
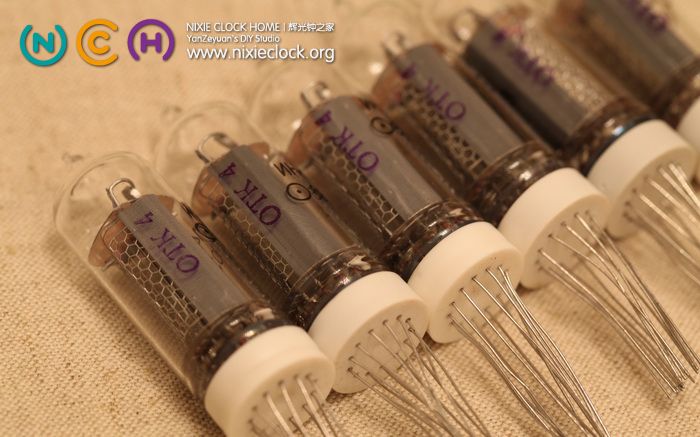
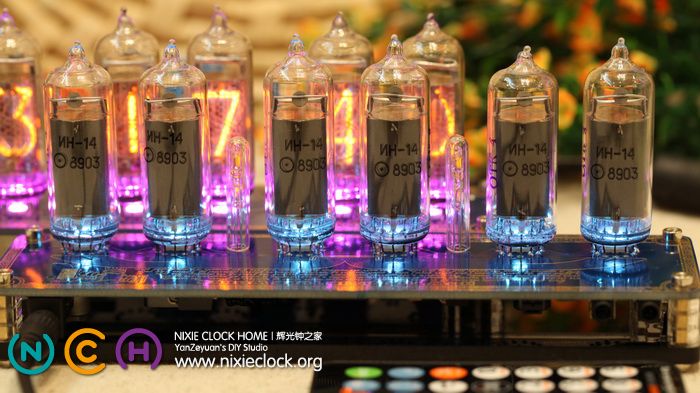
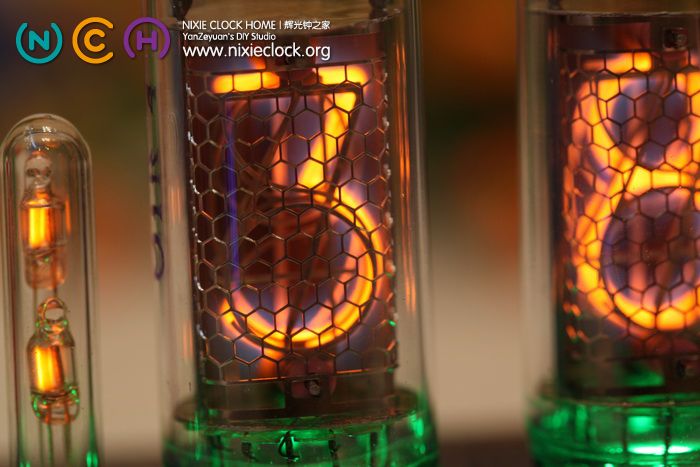
下面来秀一秀完美的IN-14辉光管,本次样机组装采用的是1989年3月同一批出产的IN-14辉光管,并且都是加盖了OTK印章。
顺便科普一下,ОТК是俄语отдел технического контроля的缩写,意为技术监督科/技术检查科,这是前苏联的质量管理体系的一个组成部分,前苏联的产品都会有这个标记,表示通过质量检测的意思。所以ОТК不是商标,译为质检合格也可以但不确切。
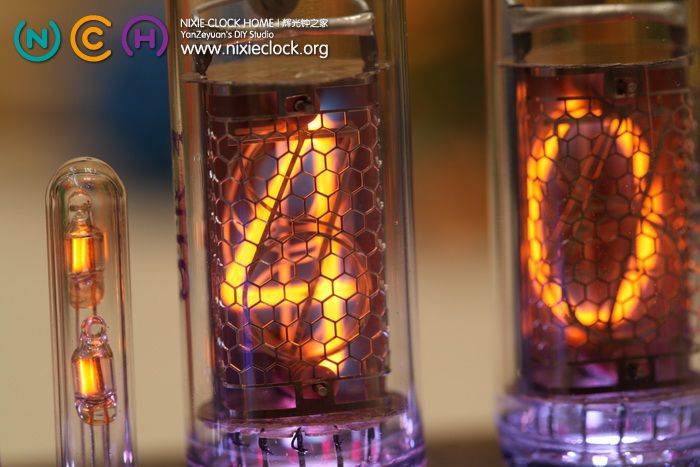
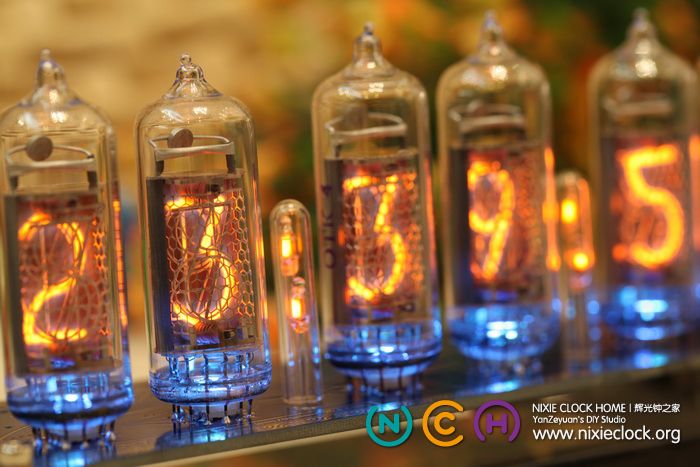
有很多朋友看到图片以后一直在疑问,辉光管底部的色彩到底如何产生的呢?是否只能显示一种颜色?
其实在IN-14辉光管底部我设计了一颗5050的RGB LED,通过颜色混合,目前能产生7钟不同的色彩。
色彩的亮度可以调节,并且可以用红外线遥控器控制闪烁模式:关闭、呼吸闪烁、常亮;
呼吸模式下,可以设置为同一种颜色呼吸闪烁,也可以设置为在7种颜色之间切换呼吸闪烁,还可以设置为使用赤、橙、黄、绿、青、蓝、紫七种颜色来表示周一至周日。
下面再欣赏一下多多美图:

DIY是一种享受,享受的是过程,更是结果……
========================================================
作者:严泽远
E-mail:yanzeyuan@163.com
QQ:6626209
2012-09-25
88 条评论
slqin2418 · 2012 年 9 月 25 日 下午 4:39
先坐沙发,在慢慢看
aguegu · 2012 年 9 月 26 日 上午 1:02
管子的 LP/RP 是什么引脚?
♂唯有→奋斗 · 2012 年 9 月 26 日 上午 8:48
Left Point & Right Point,辉光管的左侧和右侧分别有一个小数点。
不过在这里没有用到它们。
stonemore · 2012 年 10 月 7 日 下午 4:24
严老师,看了您的这个板子,发现和之前用的595加三极管的驱动方式不同哦,整个版面显得好简洁啊,不知道用的是什么驱动芯片呢,不知可否告知下型号,谢谢
♂唯有→奋斗 · 2012 年 10 月 7 日 下午 11:36
是的,这块芯片一共有64个输出,正好可以驱动6个辉光管。
型号是HV57708,具体的电路和应用原理在2011年第7期的《无线电》杂志有发表。
Chris · 2012 年 10 月 18 日 上午 6:45
Hello, How much is your Nixie IN-14 clock and where can I buy it?
Thanks
Chris
♂唯有→奋斗 · 2012 年 10 月 18 日 上午 8:50
Hi, I list my IN-14 nixie clock on eBay here:
http://www.ebay.com/itm/280991287025
Regards.
Yan.
VicentbigV · 2012 年 12 月 10 日 上午 8:33
辛苦了,我很喜欢这个时钟,但是底部下面的彩色灯光我希望能关闭..单单的只有辉光是在亮着的..
其次价格多多少少没法接受..
不过会长期关注的. 我以前有做过相关的辉光时钟实验..
最终都已失败..
♂唯有→奋斗 · 2012 年 12 月 10 日 下午 3:38
🙂
下面的彩色灯光可以根据喜好打开或者关闭或者自己调整喜欢的颜色,或者让他始终显示一种颜色,或者单色呼吸,或者自动变换呼吸,都可以。
因为大多数朋友还是喜欢这个灯光的,所以设计了这个功能。当然,不用的话自己关掉即可。
:)
Hans · 2012 年 12 月 19 日 下午 6:56
I love the clock however I worry about the exposed wires on the bottom of the tubes. What if someone touches one of them by mistake? Is there not 170v running through these? I want to buy one but have concerns due to this. Could you also supply a small transparent acrylic ring to slide over the tube to shield the exposed wires? The ring would only need to be maybe 4-5mm high, would look great and would eliminate the possible electrocution concerns.
♂唯有→奋斗 · 2012 年 12 月 20 日 上午 11:28
Hi, It’s my pleasure that you like my clock 🙂
Please don’t worry about the wires of the golden PCB, all golden wires you can see are all connect GND, other signal wires and HV wires are all insulative.
But your suggestion is very good, I can order a transparent arcylic plate with laser cut, and put it on the top of PCB, 3mm thickness, if you need, please remind me when you purchase it.
Thanks.
Yan.
r2 · 2013 年 1 月 4 日 下午 8:07
漂亮,自己没这些功底,只能赞叹了,不过有时间就会看一些基础,希望以后能自己成功做一个出来。
整体很好,但就是感觉遥控器的材质有点配不上这个精美的辉光钟!
♂唯有→奋斗 · 2013 年 1 月 4 日 下午 11:02
谢谢夸赞!
是的,遥控器是比较简易,但是面板也是经过了认真的设计。原本打算做一个全铝合金外壳的遥控器,后来由于成本的缘故放弃了!
想把一件作品做完美是一件不容易的事情!
Sebastian H · 2013 年 1 月 28 日 下午 10:30
Hello, i am living in China for a long time, my question is how much does this beautiful clock cost in RMB and what is the price for shipping to Nantong
♂唯有→奋斗 · 2013 年 1 月 28 日 下午 11:03
Hi, I sent an email to you, check it, thanks!
rein · 2013 年 1 月 29 日 上午 4:01
hi does it have the slot mahine effect to prevent cathode poisoning?
♂唯有→奋斗 · 2013 年 1 月 29 日 下午 11:53
Yes ofcourse it has the cathode poisoning prevent function 🙂
Yan.
Mickey · 2013 年 4 月 4 日 下午 10:19
請問一下這在哪邊買的到?
我找了很久都沒看到您的拍賣網站
♂唯有→奋斗 · 2013 年 4 月 4 日 下午 10:40
你好,可以去我的淘宝看一下,小店地址:
nixieclock.taobao.com
♂唯有→奋斗 · 2013 年 5 月 21 日 下午 3:13
你好,欢迎光临我的淘宝小店:
http://nixieclock.taobao.com
KU-ing · 2013 年 7 月 25 日 下午 10:32
老师,我们教授让我写的毕业论文就是这个东西,现在他说要将一个5v输入电压变成120V 请问有需要吗 ? 我这个灯泡的型号是ZM1050, 需要电压是110V+10%,请问需要吗?
♂唯有→奋斗 · 2013 年 7 月 26 日 下午 2:40
不是很明白你的意思,你是在问我是否需要你们的论文研究成果吗?
首先,这个不是灯泡,这叫辉光管,和灯泡是完全两个原理上的东西。
然后,辉光管的启辉电压一般都在145V左右,正常情况下需要170V的阳极高压,110V是无法点亮的。
最后,我从来未曾听说过ZM1050这个型号,我见过ZM1020,ZM1040等等,有图片吗?我想开开眼界!
♂唯有→奋斗 · 2013 年 7 月 26 日 下午 2:46
查阅了一下资料,的确有ZM1050这个型号的管子,不过不是NIXIE TUBE,叫做PIXIE TUBE,的确110V就能工作,不过像个圆钟表一样的表盘,这种管子倒是很少见!
我的明天 · 2013 年 8 月 30 日 下午 4:27
好东西!!!有创意
Matt Yates · 2013 年 11 月 26 日 上午 12:28
What GPS module works with your clock? Where can I get it?
♂唯有→奋斗 · 2013 年 11 月 26 日 上午 1:02
All GPS receiver with RS232 interface and 4800bps baud rate are all computable, only need rebuild a plug with an earphone plug.
Andre · 2014 年 3 月 24 日 下午 8:12
Hello,
How much is your Nixie IN-14 clock and where can I buy it? I am also interested in IN-18.
Thank You.
♂唯有→奋斗 · 2014 年 3 月 25 日 上午 8:58
Hi, I listed it on eBay, please check the item link here:
http://www.ebay.com/itm/271410584196
fxw11 · 2014 年 3 月 31 日 下午 4:45
HV57708 最大输出电压为90v,怎么可以取得180v的呢??
♂唯有→奋斗 · 2014 年 3 月 31 日 下午 5:09
这就是使用它的巧妙之处,用它来控制阴极,当阴极电压是80V的时候,辉光管数字关闭,当阴极电压是0V的时候,辉光管数字就亮了,哈!
Rodolfo · 2014 年 8 月 7 日 上午 12:07
We bought this clock and I have a question. We didn’t receive any instructions. Is there a way I could get them? Can you send them by email? One other question, what’s the lifetime of one bulb? Do you sell the bulbs in case one breaks? And if so, how much to buy a spare bulb? Thank you, very nice clock.
♂唯有→奋斗 · 2014 年 8 月 11 日 下午 12:08
Thank you for your purchasing, I have send the instruction to you, please check it.
Thanks.
Cruse · 2014 年 9 月 20 日 上午 12:27
老师,我想自己DIY一个,并研究研究。请问能否提供下原理图和PCB设计图?要是有程序就更好了。仅仅是个人研究,不会作商业应用,谢谢老师。Email:cruselee1@live.cn
Oleg · 2014 年 10 月 9 日 上午 11:17
Hello,
Do you have this clock as a DIY kit ? …would like to assemble it myself. If yes, please provide the link I can buy it from
Thanks.
♂唯有→奋斗 · 2014 年 10 月 10 日 上午 12:42
Dear sir, yes I provide the clock kit, but all SMD parts are soldered by SMT robot, you should assembly tubes and colon neons, if you need please check here:
http://www.ebay.com/itm/271625485848?ssPageName=STRK:MESELX:IT&_trksid=p3984.m1558.l2649
The clock kit price will be 228USD including shipping.
Thanks.
Yan.
Oleg · 2014 年 10 月 10 日 上午 2:28
Hello,
You got me confused now. You have assembled kit for $91.96 (http://www.ebay.com/itm/In-case-Nixie-Tube-Clock-by-YS13-3-remote-control-/151288084790?pt=US_Digital_Clocks_Clock_Radios&hash=item233978f936) And disassembled one three times more expensive. Isn’t supposed to be other way around – disassembled to be cheaper than assembled ?
Thanks again,
Oleg
♂唯有→奋斗 · 2014 年 10 月 10 日 上午 10:42
Hi Oleg, that’s not my clock, that’s copy my design, and not the nixie clock, it’s VFD tube clock, YS13-3 tubes made in China, small than IN-14 nixie tubes, you know VFD tubes is very cheap than nixie tubes, they’re different.
Yan.
Leviy · 2014 年 11 月 15 日 上午 9:51
你好~我是台灣的朋友~很喜歡你的東西~不知道你有沒有寄到台灣呢?
♂唯有→奋斗 · 2014 年 11 月 15 日 下午 12:38
你好,没问题的,经常发货至台湾,运费30RMB。
Leviy · 2014 年 11 月 15 日 下午 10:26
OK~那我回去在跟你下訂一台~一共多少?
Flute · 2014 年 12 月 31 日 下午 2:11
您好,请问辉光管的寿命大概有多久呢,比起一直开着,每天开关会影响寿命吗
另外请问您的eBay点还开吗,之前的链接好像不能用了
谢谢
♂唯有→奋斗 · 2015 年 1 月 1 日 上午 12:43
你好,ebay的item还在,请看这里:
http://www.ebay.com/itm/281545351803?ssPageName=STRK:MESELX:IT&_trksid=p3984.m1558.l2649
Jeff Walton · 2015 年 3 月 6 日 下午 2:13
I love this clock and the glow of nixies! Nixie tubes are an art form that is rapidly disappearing. This clock by Yan Zeyuan is a beautiful and fitting way to display both the nostalgia of a the soft orange glow of the nixie tube and the beautiful precision of modern circuitry. The PCB is a work of art as well as the features and housing of the clock. The remote control is a convenient, easy and complete way to control the clock without the need to mess with buttons all over the chassis. The GPS option also works flawlessly. The only change I could suggest is to add a clear plate to the top of the PCB which would be thick enough or raised to completely cover the soldered leads at the bottom of the display tubes.
I purchased the version of the clock which uses the IN-8-2 nixie tubes in order to get the correct “5” instead of the upside down “2” as used in the IN-14. The PCB has a clever option to accommodate either the IN-8-2 or the IN-14 at the time of assembly. Very cool! The construction and design are OUTSTANDING! It offers the most complete and elegant small tube nixie clock available anywhere. Thank you for such a beautiful clock, fast delivery and the great design.
J. Walton · 2015 年 3 月 6 日 下午 2:16
I love this clock and the glow of nixies! Nixie tubes are an art form that is rapidly disappearing. This clock by Yan Zeyuan is a beautiful and fitting way to display both the nostalgia of a the soft orange glow of the nixie tube and the beautiful precision of modern circuitry. The PCB is a work of art as well as the features and housing of the clock. The remote control is a convenient, easy and complete way to control the clock without the need to mess with buttons all over the chassis. The GPS option also works flawlessly. The only change I could suggest is to add a clear plate to the top of the PCB which would be thick enough or raised to completely cover the soldered leads at the bottom of the display tubes.
I purchased the version of the clock which uses the IN-8-2 nixie tubes in order to get the correct “5” instead of the upside down “2” as used in the IN-14. The PCB has a clever option to accommodate either the IN-8-2 or the IN-14 at the time of assembly. Very cool! The construction and design are OUTSTANDING! It offers the most complete and elegant small tube nixie clock available anywhere. Thank you for such a beautiful clock, fast delivery and the great design.
William Lee · 2015 年 5 月 5 日 上午 10:08
I think this is the one I actually bought the version 2. Can you please send me instructions and maybe the cost of buying a few extra tubes from you? Thanks, the clock is awesome!!!
♂唯有→奋斗 · 2015 年 5 月 5 日 上午 11:17
Dear sir, I sent the user manual to williamlee650@hotmail.com just now, please check it, thank you for your purchasing.
Steven · 2015 年 5 月 23 日 上午 5:58
Were to download user manual?
Thanks
♂唯有→奋斗 · 2015 年 5 月 23 日 上午 10:07
Please check user manual here:
http://pan.baidu.com/s/1hqDt0Io
Steven · 2015 年 5 月 23 日 下午 7:32
Thank you
Maybe version 2n manual?
also where to buy temp sensor?
Thank you
♂唯有→奋斗 · 2015 年 5 月 23 日 下午 11:33
yes, the manual is for version2.
If you need temp sensor, I can provide that, only 10USD including shipping.
Thanks.
Tim · 2015 年 7 月 1 日 上午 11:47
Gorgeous artware. It obsessed me.
Serg · 2015 年 8 月 24 日 上午 5:16
Hello! Can I buy you DIY kit (without tube) to built Nexie IN-14 clock?
And if “yes”, how much will it cost with shipment to Denmark?
Thanks.
♂唯有→奋斗 · 2015 年 8 月 24 日 上午 8:55
Dear sir, thank you for contact. we don’t provide clock kit because all components are SMD parts, difficult to solder and assembly by hand.
All parts are soldered by SMT robot, if you need the clock without tubes, please email me yanzeyuan@163.com, you can prepare tubes and solder them by yourself.
Thanks.
Yan.
Eric · 2015 年 11 月 15 日 上午 3:21
Hello! I just purchased your clock and I am astonished with it! Can you please send me the user manual to Mellizano.EH@gmail.com
♂唯有→奋斗 · 2015 年 11 月 15 日 上午 10:16
thank you for your purchasing, user manual has been sent just now.
Max · 2015 年 12 月 6 日 下午 11:36
您好,我想买这个钟,刚在ebay上看了下,Nixie Clock Home这个应该是您的店铺吧,但是已经找不到商品了,还有我在澳洲,也可以寄吗?
♂唯有→奋斗 · 2015 年 12 月 7 日 下午 10:30
你好,澳洲可以寄的,普通挂号邮包运费125RMB,DHL运费在210块左右,淘宝链接在这里:https://item.taobao.com/item.htm?id=9962980608
Cedar · 2015 年 12 月 28 日 下午 9:19
严泽远老师您好!我关注辉光管很久了,首先要感谢您在网络上发布的各类资料,使得我和众多对辉光管有兴趣的朋友们能够自己动手尝试DIY。我最近在试着自制一个IN-14的时钟,但有些担心自己设计的封装不能对齐。如果可以的话,能麻烦您发给我一份吗?
谢谢!
♂唯有→奋斗 · 2015 年 12 月 28 日 下午 9:53
感谢关注与支持,你先尝试着设计电路图和PCB吧,遇到哪些封装没有再找我,我的邮件yanzeyuan@163.com。
Gary · 2015 年 12 月 29 日 上午 5:18
Hello! I just purchased your clock and I love it! Can you please send me the user manual. Did not see the the manual online.
♂唯有→奋斗 · 2015 年 12 月 29 日 上午 11:04
Dear sir, thank you for your purchasing, please check the user manual in English version here:
http://pan.baidu.com/s/1hqDt0Io
David Radford · 2015 年 12 月 29 日 下午 2:27
Great clock! Got it for my girlfriend as a Christmas gift. She loves it, but wonders, is there a way to turn off neon colon breathing?
♂唯有→奋斗 · 2015 年 12 月 29 日 下午 10:41
Hi David, it’s my pleasure that your girlfriend like my clock, but sorry the neon colon can not turn off or lighting always.
Thanks and regards.
Yan.
Edmund · 2016 年 6 月 26 日 下午 10:13
Greetings,
I was wondering if the IN-14 clock is still available for sale. I clicked the ebay link, but it is expired. I cannot find a way to purchase one of your wonderful clocks on this site, and I was hoping you could direct me there. Many thanks for your assistance.
E
♂唯有→奋斗 · 2016 年 6 月 27 日 下午 11:44
Hi, it’s my pleasure that you like my design, please check item on eBay here: http://www.ebay.com/itm/-/272288333942?
Thanks.
Kris Koi · 2016 年 7 月 15 日 下午 4:22
看完你的站後,真的很想自己動手做一個(利用樹莓),但什麼硬件也不懂,請問有沒有相關的介紹
Haodong Wu · 2016 年 10 月 5 日 下午 2:29
你好老师,我没有学过任何的相关知识,甚至电工知识都不足,只会一点电焊,我能够自己动手做辉光管时钟吗?(我真的很喜欢辉光管)
♂唯有→奋斗 · 2016 年 10 月 5 日 下午 6:24
你好,没有电路知识也没关系,只要会焊接,懂得基本的电子元器件,能分清楚二极管正负极和电容政府极,应该可以组装好我的DIY套件,但是我现在只有VFD电子管的套件,没有辉光套件!
maxidea · 2017 年 2 月 22 日 上午 10:34
吃一个月方便面,下个月私房钱就买这个了!
Federico Tapia · 2017 年 2 月 26 日 上午 10:22
Hi, do you have instructions for this clock? I been told that can be turned off automatically to save tubes life…
Thanks!!!!
♂唯有→奋斗 · 2017 年 2 月 27 日 上午 2:50
Please check your mail box 😉
Duan · 2017 年 2 月 28 日 上午 11:06
严老师您好,最近打算自己做辉光管时钟。 看您用的是HV57708芯片,一直有一个问题:抬高某一个数字的电平是否会造成与发光的数字之间有电子流,从而造成阴极中毒呢?
tothetimetolife · 2017 年 3 月 19 日 下午 10:45
老师你好,请问IN-14的使用寿命大概是多少小时呢?谢谢了!
♂唯有→奋斗 · 2017 年 3 月 19 日 下午 11:21
24小时使用,3-4年左右吧!
Eric Hans · 2017 年 5 月 27 日 下午 4:22
Hello sir, I would like to know are you still selling this product, if yes, is there an option for no nixie tubes? Which mean selling the soldered board only.
♂唯有→奋斗 · 2017 年 6 月 9 日 上午 10:53
Sorry for late reply, I just come back from US yesterday. Yes if you need the clock without tubes please let me know, I can give you an offer for it, email me at yanzeyuan@qq.com. Thanks. Yan.
Ryan Cheung · 2017 年 10 月 13 日 上午 4:38
Hi, I just bought this at the 2017 Maker Faire in San Mateo California this summer. I would like to buy another one. I would also like to buy the small tube that covers the ‘:’ between the numbers. The cover tube fell and broke. Your eBay shop doesn’t show you have this for sale, how can I buy it?
♂唯有→奋斗 · 2017 年 10 月 13 日 下午 12:56
Hi Ryan, My partner Aiden will contact you soon, thanks. Yan.
Ryan Cheung · 2017 年 10 月 13 日 上午 4:39
Also wondering if you would make a USB power for this. That would be great.
David Johnson · 2017 年 10 月 25 日 上午 1:24
Dear Sir,
Your IN14 Nixie clock with remote (assembled from Amazon) is wonderful. I am confused, however, about how to change the LED color mode. Would you be so kind as to tell me what buttons to push on the remote to do this?
Thank you very much,
David Johnson
Daemon Wang · 2019 年 8 月 25 日 下午 12:17
严老师我想问一下,这款驱动芯片我查看芯片手册发现只能输出80v高电平,请问是如何驱动150v以上才能点亮的辉光管的呢,还有一个问题是,一般DIY辉光钟,您是推荐用51还是32做主控芯片呢?谢谢!
♂唯有→奋斗 · 2019 年 8 月 28 日 下午 6:45
高压芯片的输出脚连接的是辉光管的阴极,辉光管阳极依然是170V正高压,当芯片输出0V时,辉光管阴极和阳极压差为170V,启辉显示。当芯片输出80V时,辉光管阳极和阴极压差只有90V,达不到启辉电压,故熄灭!51还是32取决于自己对哪款芯片熟悉,用树莓派一样可以,用51也同样可以,对于时钟这个应用来说,最简单最便宜的51都绰绰有余!
Kan · 2019 年 9 月 23 日 下午 9:32
Hello sir.
I watch this clock every day and am very happy.
but,I often do not know how to set.
The manual that was at baidu.com has also disappeared.
Is the manual for this product published somewhere?
♂唯有→奋斗 · 2019 年 9 月 23 日 下午 11:11
I have sent the user manual to you, please check your mail box.
Thanks.
Tom Chang · 2020 年 1 月 20 日 下午 11:26
老师你好,小弟电路理论不太好,不太明白HV57708的输出脚连接稳压二极管再到辉光管阳极的原因..在网上找到很多都会反接75V的稳压二极管,但是二极管在170v / 90v压差时电流不是都能通过吗?
♂唯有→奋斗 · 2020 年 1 月 21 日 上午 12:33
75V的稳压二极管是为了提供给HV57708提供输出电平的钳位电压而已!
Tom Chang · 2020 年 1 月 21 日 上午 6:31
感谢老师回答, 因为小弟用一样的连接方法, 只连接BL和POL来测试全高电平和低电平,发现2种电平压差都是9x V..二极管都有75V压差结果怎样都不能亮起来..在想是不是晶片坏了..